This recipe feeds 4 people so if you need to you can easily double this.
Ingredients:
1 cup dried pinto beans
1 jar mild salsa
2 tablespoons chopped canned Chipotle chilies
2 tablespoons all purpose flour
1 1/2 pounds boneless skinless chicken thighs
Coarse salt and pepper
1 medium red onion chopped
1 red bell pepper chopped
1/4 cup sour cream for serving
1/4 cup chopped fresh cilantro for serving
Directions:
1 in a 6 quart slow cooker, stir together beans, salsa, chilies, flour and 1 cup water. Season chicken with salt and pepper;arrange on top of bean mixture. Scatter onion and bell pepper on top of chicken
2.Cover and cook on low for 8 hours.
3 Remove chicken from stew;shred into large pieces and return to pot. Serve topped with sour cream and cilantro.
Note... Warm Flour Tortillas would be good with this too. A good meal to put on before you leave for work.
Saturday, October 31, 2009
Chocolate Nachos
This one might sound a little strange , but it's good.
Ingredients:
1/4 cup sugar
1/4 teaspoon ground cinnamon
8- 6 inch flour tortillas
1/4 cup butter melted (no substitutes)
1 cup semisweet chocolate pieces
2 teaspoons shortening
Directions:
1 Combine sugar and cinnamon in a small bowl. Brush one side of each tortilla with melted butter;sprinkle with sugar mixture. Cut each tortilla into eight wedges. Arrange half of the wedges in a single layer on a 15x10x1 baking pan. Bake in a 350 degree oven for 10 to 12 minutes or until edges are lightly browned
2 Meanwhile, melt chocolate pieces and shortening in a small saucepan. Remove wedges from oven. Spread in an even layer on a serving platter;cool slightly. Drizzle with half of the melted chocolate mixture.
3 Arrange the remaining wedges and repeat above.
Dried Flower Vine Wreath
Three groupings of dried hydrangea, grasses, berries and blossoms are attached with wire or hot glue to this grapvine wreath base.
I think this is so attractive. You can use any kind of flowers you like, but I like these. So Fall looking .
Triple Layer Peanut Butter Brownies
What could be better than this !! O' My these look like heaven.
Ingredients:
1 package brownie mix
1 cup milk
1 package Vanilla flavor instant pudding
1 cup creamy peanut butter
1/2 cup powdered sugar
1 1/2 cup Cool Whip Do not thaw
3 squares Semi Sweet Chocolate
1/2 Dry Roasted Peanuts coarsely chopped
Directions:
Prepare and bake brownies in a 13x9 pan , and cool. Meanwhile beat milk and pudding mix with whisk for 2 minutes.Add peanut butter and sugar mix well. Refrigerate until brownies are completely cooled
Spread pudding mixture over brownies
Microwave cool whip and chocolate on high for 1 minute, stirring every 30 seconds. Spread over pudding;sprinkle with nuts. Refrigerate for 1 hour.
Mediterranean Mostaccioli
This one looks yummy !!!
Ingredients:
4 ounces dried mostaccioli pasta
2 cups sliced zucchini
8 ounces ground beef
1/2 of a medium eggplant peeled and cubed
1- 141/2 ounce can diced tomatoes with basil,oregano and garlic
2 tablespoons tomato paste
1/2 cup shredded carrot
1/4 cup snipped fresh basil
1/4 teaspoon ground cinnamon
1 tablespoon balsamic vinegar
1/2 cup shredded mozzarella cheese
Directions:
1. Cook pasta according to directions on package adding zucchini during the last 2 minutes of cook. Drain and keep warm
2. Meanwhile, for sauce in a large skillet cook beef and eggplant over medium heat until meat is brown;drain off fat. Stir in undrained tomatoes, tomato paste,carrot, basil, and cinnamon. Bring to a boiling;reduce heat. Simmer uncovered about 2 minutes or to desired consistency, stirring occasionally. Remove from heat,
3 Transfer pasta mixture to a serving dish. Spoon sauce over pasta mixture and sprinkle with cheese.
Dyed Canvas Sneakers
Canvas sneakers are comfy and cool,but you may not find them in colors you want. Using fabric dye you can match them to fit your wardrobe or your mood
Materials:
Large basin or bucket
Liquid fabric dye
Salt (if needed check dye directions )
White canvas sneakers, laces removed
1 Fill basin with hot water. Add dye to water following manufacturer's instructions for sink or bucket dyeing
2 Wet sneakers with hot water, and place in dye bath
3 Stir for amount of time stated on dye bottle. Rinse as directed
4 Air dry shoes, or place in dryer
5 Clean basin immediately to avoid staining
Custom Coasters
These blooming shapes add a shot of color to your tabletop.I could see these done in Fall colors , for your Thanksgiving guest. It's a simple leaf pattern. You will need a roll of thin cork and sheets of felt.
Iron both on a low setting to flatten. Attach cork to the felt with a thin layer of white glue. Let dry for about 1 hour.
These coasters are about 5 inches across. Trace your pattern on with disappearing ink and cut out.
Iron both on a low setting to flatten. Attach cork to the felt with a thin layer of white glue. Let dry for about 1 hour.
These coasters are about 5 inches across. Trace your pattern on with disappearing ink and cut out.
Terry Cloth Caddy
Clear off bathroom counter tops by storing toiletries in a hanging organizer. To make one, just stitch a few seams in a hand towel
Materials:
Hand towel 19x40/straight pins/sewing machine/1 yard grosgrain ribbon/1/2 inch diameter dowel ) 2 inches longer that width of towel)
Fold down top of towel 1/2 inches;pin, then sew to create a channel for the dowel. Flip towel over, fold it onto itself so it overlaps about 5 inches;pin.
Repeat to make a second pleat so bottom edge of towel is bottom edge of caddy;pin.
Sew along both sides of towel,leaving channel at top open and reinforcing pockets corners.
Sew two more seams to divide towels width into thirds. Pass dowel through channel,tie ribbon to both ends, and hang.
Pumpkin Votives
I thought these would be pretty just sitting around not necessarily a centerpiece.
You will need assorted miniature pumpkins, votives floral cutters and hand drill fitted with 1 1/2 inch wide paddle bit.
1. Using floral cutters, trim the stem from the pumpkins
2 Center the paddle bit over the pumpkin, and drill about 1/2 inch deep
Insert votive.
You will need assorted miniature pumpkins, votives floral cutters and hand drill fitted with 1 1/2 inch wide paddle bit.
1. Using floral cutters, trim the stem from the pumpkins
2 Center the paddle bit over the pumpkin, and drill about 1/2 inch deep
Insert votive.
Mini Pumpkin Centerpiece
Anchor tapers inside mini pumpkins to make centerpieces. Cut a hole inside each pumpkin with a utility knife, and then carve out space for candles with a melon baller.
If desired, stack 2 and secure from inside hole with straight pins. With adhesive putty,affix tapers inside gourds and pumpkins to leaves that cover overturned pie plates.
Countdown to Thanksgiving
Ok, ladies we are on the countdown to Thanksgiving. Where did the year go.!!!
I hope you will continue to stop by and check out my blog, I am going to have alot of ideas for your holiday season. From recipes and decorating your home.
I have been searching the net looking for great ideas for you. I have a abundance of really great Christmas ideas already in my bag of tricks.
So continue to stop by and check me out!!!
Friday, October 30, 2009
Textured String Bracelets
Use leftover string from craft projects to make these textured bracelets.
Purchase plastic bangles from the craft store. Using craft glue, attach 1 inch of the tail end of the string to the inside of the bangle. Wrap string around bangle until bracelet is covered. Cut the string leaving a 3 inch tail, thread through a needle and thread the tail under strings on inner side of bangle to secure.
For a striped effect,alternate string colors as you work.
Cork Wrapped Candles
This is a clever idea to dress up votive candles.
Cut strips of cork not quite long enough to wrap around votive candle holders.
Punch holes along the ends of the cork strips. Wrap the strips around the votive holders and lace a golden elastic string through the holes shoestring style.
Leather lacing would look good too.
Cut strips of cork not quite long enough to wrap around votive candle holders.
Punch holes along the ends of the cork strips. Wrap the strips around the votive holders and lace a golden elastic string through the holes shoestring style.
Leather lacing would look good too.
Bottle Cap Magnets and Thumbtacks
For this project it is best to use twist off caps because they don't bend when removed.
Tools and Materials:
1 inch circular craft punch
Craft glue
Bottle caps
clear casting resin
Contact cement
Small magnets or thumbtacks
1 Using a craft punch, cut put pictures. Using craft glue , attach one picture to the inside of each bottle cap. Let dry.
1. Cover a work surface to protect it from spills, and lay caps on top. Following manufacturers instructions for clear casting resin,fill each bottle cap to the rim. Let dry overnight.
3 Using contact cement, attach magnets or thumbtacks to the backs of the bottle caps. Let dry overnight before using.
Photo Gallery Pillow
This would make a great family present and keepsake.
How to make it :
1 To create the memo board pillow,cut lengths of ribbon to fit across the pillow diagonally in both directions
2. Secure the ribbons in a crisscross pattern with a dab of fabric glue or a few stitches at each ribbon end
3 Then sew a button on top of each intersections and trim any ribbon ends
4 Fir the photo transfer pillow, run a color copy of your photo onto a fusible ink jet fabric sheet
5 After heat setting the image to the printed fabric, the picture is ready to be trimmed and glued to the pillow.
6 Disguise the edges with decorative rickrack and ribbon, then tack on letter charms.
Red Beans with Orzo
This one is a slight change from just plain chili.
Ingredients
1- 14 ounce can chicken broth
1 1/2 cups water
1 1/3 cups dried orzo pasta
1/4 cup finely chopped onion
1 teaspoon herbes de Provence or dried Italian seasoning crushed
1 15 ounce can red beans or pinto beans rinsed and drained
1 ounce prosciutto or cooked ham, cut into thin strips
2 tablespoons snipped fresh flat leaf parsley
1/3 cup finely shredded Parmesan cheese
Directions:
In a medium saucepan, combine chicken broth and the water and bring to a boil. Stir in uncooked orzo, and herbes de Provence. Return to boiling;reduce heat. Simmer uncovered for 12 - 15 minutes or just until orzo is tender and most of the liquid is absorbed, stirring often
2. Stir in drained beans,prosciutto and parsley; heat through. Top individual servings with Parmesan cheese
Be creative with extra paper
I thought this was adorable and functional at the same time. What a great gift idea.
Transform extra paper into a one of a kind clock with a shadow box clock set. Shop you local craft store for the premade clock then add your own personality with paper scraps and photos.
Cute, huh? I like this one
Transform extra paper into a one of a kind clock with a shadow box clock set. Shop you local craft store for the premade clock then add your own personality with paper scraps and photos.
Cute, huh? I like this one
Thursday, October 29, 2009
Tray Divider
We are looking for ways to increase our cupboard space, there is never enough.
You'll need a tray almost as wide as the cupboards depth. Cut a piece of nonskid shelf liner to fit the tray so glasses stay put and rims are protected.
Place large glasses upside down on the shelf, set tray on top, and arrange smaller glasses upside down on top of tray .
You'll need a tray almost as wide as the cupboards depth. Cut a piece of nonskid shelf liner to fit the tray so glasses stay put and rims are protected.
Place large glasses upside down on the shelf, set tray on top, and arrange smaller glasses upside down on top of tray .
Tin Containers
This project is shown in Spring colors, but I see not reason why you could not do them in Fall colors.
Make a matching set of vessels by painting metal cans in muted hues. Here again in Fall colors, like browns, gold, rust colors.
They refinished soup, tomato and coffee tins in assorted sizes, and fitted them with drinking glasses to prevent rusting.
Smooth any jagged edges with a metal file, then apply 2 coats of a semi gloss latex paint . Then insert a glass into each container, fill with water and tuck in your flowers.
Curried Vegetable Soup
This soup is low in calories and total fat!! It's a good one.
Ingredients
3 cups cauliflower florets
1- 14 ounce can unsweetened coconut milk
1- 14 once can vegetable or chicken broth
1 tablespoon curry powder
1/4 cup chopped fresh cilantro
2 cups frozen baby peas=vegetable blend
2 pita bread rounds cut into wedges (optional)
1 tablespoon olive oil
Fresh cilantro sprigs and crushed red pepper
Directions:
1. Heat broiler. In Dutch oven combine cauliflower, coconut milk, broth, curry powder, and 1/4 cup cilantro. Bring to boiling over high heat. Reduce heat to medium low and simmer covered for 10 minutes until cauliflower is tender. Stir in frozen vegetable blend. Cook, uncovered, until heated through. Season with salt.
2. Meanwhile, place pita wedges on baking sheet. Brush both sides with oil. Sprinkle with 1/4 teaspoon curry powder. Broil 3-4 inches from heat for 4 minutes, turning once. Serve with soup.
Wednesday, October 28, 2009
First " Dab" of Snow
White Bean-turkey chili with corn bread dumplings
Start to finish 22 minute,this turkey chili might be a good for after Thanksgiving. We are all looking for leftover turkey recipes.
Ingredients
1 lb cooked turkey
1 jar chunky salsa
1 15 ounce cannellini beans , rinsed and drained
1 teaspoon chili powder
1 8.5 ounce pkg corn bread mix
1 egg
1/4 cup shredded cheese (cheddar)
Silvered green onions
Directions:
1. Chop turkey. In dutch oven combine turkey,salsa, beans,chili powder and 2/3 cup water. Bring to boil
2. Meanwhile, for dumplings, in a medium bowl mix together corn bread mix,egg and 1/4 cup water. Drop batter by large spoonfuls on boiling turkey chili
3. Cover, reduce heat and simmer for 10-15 minutes or until a wooden pick inserted into dumpling comes out clean. To serve top with cheese and green onions.
Tuesday, October 27, 2009
Cheddar Cornmeal Sticks
These look yummy!!
Ingredients:
2 cups finely shredded sharp cheddar cheese
1/2 cup butter
1 1/4 cups all purpose flour
1/4 cup yellow cornmeal
1/4 teaspoon salt
1/4 teaspoon cayenne pepper
1/4 teaspoon ground nutmeg
Directions:
Pre heat over to 350 . Lightly grease baking sheets;In a large bowl, combine shredded cheese and butter;let stand until room temperature. Beat with an electric mixer until well mixed. Stir in flour,cornmeal,salt,cayenne pepper, and nutmeg. Divide dough in half.
On a lightly floured surface,roll each dough half into a 12x4 rectangle. Using a sharp knife, slice dough into 4x1/2 inch pieces.
Place dough pieces 1/2 inch apart on a prepared baling sheet. Bake about 15 minutes or until bottoms are lightly browned Transfer to a wire rack and cool.
Saving Eggs
This was a new one to me !! Save the egg yolks when a recipe calls for using only whites, or vice versa.
If you don't plan to use the eggs immediately,pour them into an airtight container and freeze.
To prevent the yolks from gelling, add a pinch pf salt or a heaping teaspoon of sugar for every four yolks. The day before you use the eggs, place the container in the refrigerator, and allow them to thaw overnight.
Now, that's interesting !!
Chore Chart
Kids can pledge to lend Mom and Dad a hand around the house with this flowery card.
Materials:
81/2 by 11 sheet of heavyweight paper /glue/card stock
Contact Paper
Instructions:
1. Fold in half an 8 1/2 x 11 inch sheet of heavyweight paper so that the shorter ends match up
2. Cut a flowerpot shape from colored construction paper or card stock and glue it to the lower portion of the card face. Attach only the bottom and side edges and leave the top unglued.
3.Cut out a bunch of colored flowers and thick green stems and then glue the stem tops to the back of the flowers.
4.Once the glue dries, print a different chore on the back of each stem
5.Inscribe the inside of the card with the words"Pick a Flower and you will see the jobs you'll pick this week for me " and sign it . All that's left to do is to plant the flowers in the pot and present the card.
Laminate the card and flowers with Contact paper to make them longer lasting
Dish Towel Apron
Fashion an apron from a good looking dish towel this one is 16x24.
Cut three pieces of wide twill tape . One 30 inches long for the neck loop,2 24 inches long for the waist ties.
Fold in right and left sides of towels 3 inches. Put each end of neck loop 1/4 inch in from a folded edge.
Fold excess fabric back over ends;pin in place. Pin one end of each waist tie to each long side, 9 inches from top. Stitch over tape ends.
Cute. huh ?
Lavender Drawer Liner
Lavender sachets offer a wonderful way to infuse your clothes with a sweet scent. You can also create an aromatic liner for your whole drawer with a washable fabric and Velcro
Materials:
Scissors/fabric such as prewashed linen
Pins/chalk/1/2 inch Velcro /12 ounces dried Lavender
Measuring cup/funnel
How To:
1. Measure the length and width of the inside of the drawer, and add 1/2 inch to each dimension for seam allowances
2.Cut two pieces of fabric to these measurements and pin them together, wrong sides facing. Using chalk,divide the length of the pinned fabric into thirds. For adding and removing dried lavender, mark three 4 inch openings on one of the fabric's long sides, centered within each section.
3.Stitch the two pieces of fabric all the way around, stopping at the three openings. Clip the corners . With an iron, press open the seam allowance on the side with the openings.
4. Cut three 4 inch lengths of Velcro. Pin Velcro to the inside of the seam allowance at the openings to make sure the Velcro lines up with the pressed edge. Sew Velcro to seam allowance.
5. Turn the liner right side out through one of the openings and press.
6. To divide the liner into thirds,top stitch two rows. Fill each pocket with about 4 ounces dried lavender.
Cutest Thing
I just had to share this picture I found while browsing around. It's a lop eared rabbit. I think this is about the cutest thing I have ever seen!!! Except for Scooter of course.
Monday, October 26, 2009
Hanging Doorstop
A good doorstop is always on hand,but doesn't get underfoot when it's not in use --like this simple wedge,which hangs from a doorknob.
Have a wooden wedge cut at a lumber store to measure 7 inches long and 3 inches wide, and 2 inches high at its highest end.
Drill a hole through the thick end using a 3/8 inch or 1/2 inch drill bit. Sand with fine grain sandpaper.
Stain or whitewash;don't use paint, which will chip. Cut a piece of grosgrain ribbon long enough to go through the hole and over the knob, and tie.
Now I would never have thought of this one !!
Step Ladder Bed Stand
Take advantage of every bit of bedroom space by stacking your nighttime necessities instead of crowding them on top of a tiny stand.
The four wide rungs of an extra stepladder provide a steady spot for a row of books as well as the necessary alarm and a reading lamp.
Now, I would never have thought of that!! What do you think?
The four wide rungs of an extra stepladder provide a steady spot for a row of books as well as the necessary alarm and a reading lamp.
Now, I would never have thought of that!! What do you think?
Halloween Carving
Halloween Carving Party
Jennifer and Ben brought over 4 pumpkins and dinner last night. We had so much fun carving these pumpkins. I have not done this since Jennifer was little.
Sunday, October 25, 2009
Baked Ziti
This is a great meal for a group. It feeds 8 people. Prep time is minimal.
Ingredients:
2 tablespoons grated Parmesan
1 pound dry Ziti pasta
6 ounces mozzarella
1 1/2 cups sour cream
2 jars spaghetti sauce
1 onion chopped
1 pound hamburger
6 ounces Provolone cheese
Directions:
Bring a large pot of water to a boil. Add Ziti pasta, and cook until tender about 8 minutes. Drain
In a large skillet, brown onion and ground beef over medium heat. Add spaghetti sauce, and simmer 15 minutes.
Preheat oven to 350 degrees. Butter a 9x13 inch baking dish. Layer as follows: 1/2 of the Ziti,Provolone cheese, sour cream, 1/2 sauce mixture, remaining Ziti, mozzarella cheese and remaining sauce mixture. Top with grated Parmesan cheese.
Bake for 30 minutes in the oven or until cheeses are melted.
Twine Dispenser
The reviews on this dandy little idea, were very positive. The only suggestion was to recycle coffee cans instead of purchasing new cans. Good idea !!!
One ladies husband took it a step further, by attaching a magnet inside the can to attach his scissors.
Just by making a hole in the lid you have a easy solution to a gardeners nightmare. Instead of your twine rolling away or getting tangled it stays in one place.
One ladies husband took it a step further, by attaching a magnet inside the can to attach his scissors.
Just by making a hole in the lid you have a easy solution to a gardeners nightmare. Instead of your twine rolling away or getting tangled it stays in one place.
Button-Filled Flower Arrangement
Make a striking arrangement by displaying buttons en Masse in a vase. The create an eye catching vision of a rippling pool of baubles.
You'll need a large glass vase, a narrower vase that fits inside it, and enough buttons to fill the space between them. Use a heavier button , so that they don't float.
Fill the bottom of the large vase with buttons,and place the second vessel on top. Add more buttons, filling the space between the vessels, and then add the water.
Fill the smaller vessel with water, and arrange flowers inside.
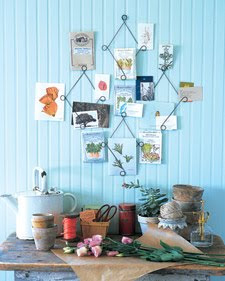
Wire Organizer
Whether your work space is an office or a garden shed, this wall mounted wire organizer can help maintain order .
How to :
1. Wrap 14 gauge wire tightly around a 1/2 inch wooden dowel 3 times to create a loop;measure 5 inches along wire, and repeat, continuing to wrap and measure until you have 5 loops along 20 inches of wire. Snip off excess at first and last loops.
2. Form a diamond shape;Bend wire at loops overlapping first and last. Using flat nose pliers, twist 28 gauge wire around overlapped loops to secure. Repeat to make 3 more diamonds. Using nails, hang diamonds on wall in a larger diamond configuration.
Slip in business cards,photographs, seed packets and anything else you want to have handy.
Pork and Slaw Barbecue Rolls
Just because it's no longer summer.. we can still enjoy a good BBQ sandwich
Ingredients:
1 4-5 pound pork shoulder roast or pork shoulder blade Boston roast
3/4 cup cider vinegar
2 tablespoons packed brown sugar
1/2 teaspoon salt
1/2 teaspoon crushed red pepper
1/4 teaspoon ground black pepper
16 kaiser rolls, split and toasted
Directions:
1. Place meat in a 4-6 quart slow cooker. In a small bowl combine vinegar, brown sugar, red pepper and black pepper. Pour over meat.
2. Cover and cook on low for 10 -12 hours,or 5 -6 hours on high
3. Transfer meat to a cutting board, reserve cooking juices. When cool enough to handle, cut meat off bones and coarsely chop. In a medium bowl combine meat and as much of the juices as desired to moisten. Arrange meat on roll bottoms. Serve with coleslaw on side or on top
Subscribe to:
Posts (Atom)